
How to make a Vintage Wreath and more with Simply Vintage...

The lovely Melissa Waudby from Simply Vintage is back with us this week, so to give you a sneak peek of what's to come on her show, check out her Craft Inspiration Pack Challenge. She'll be with us this Wednesday with tonnes of inspiration and demonstrations of how you can get the most from your gorgeous Craft Inspiration Pack at 10am! Here's her step-by-steps...

This month I have been working on a little challenge - My Craft Inspiration Pack Challenge! To see how many craft projects I can make from just one of the Simply Vintage Mixed Craft Inspiration packs.

The full results will be live on the show in Wednesday morning - but here is a couple of sneaky pics of just two mixed media projects I recently finished.


From the kit I used:
  • 1 sheet of music
  • 1 piece of floral fabric
  • 3 sheets of pages
  • Buttons
  • Lace pieces
  • Ribbon
  • Snap fasteners
  • Postcard


Just 10 elements…..from the 30 included! (and there are still parts of these left over!)


A Mixed Media Tin

Turning a vintage tin into a personal treasure!


Using the mixed craft inspiration pack, I start with a quick read of the lovely papers and pages included.


For this tin the first words I saw was "said the tailor" so this set the scene for a lovely tailors story.

The first backing paper I used was a 1950's weather chart which was torn into the lid and secured using a PVA glue mix with water (I use a 2:1 glue to water ratio).


Then comes the fun bit... taking some of the fabric piece and snipping around the flower design, picking out the buttons from the kits to use and adding a few bits of sewing paraphernalia to complete the story.
  
Once the items had been arranged to please the eye and heart, a thin layer of the PVA was added to seal the tin... a beautiful little memento from a tiny tin!


Mixed Media Wreath

A lovely Autumnal or Festive gift!

The wreath is created with various techniques beginning with layers of decoupage using the vintage pages included in the pack.


Cotton was then wrapped around the ring in sections…


…and the cut out flowers added. Each of these are fixed with the same PVA mix as before, making sure all of the white ring is covered.


A gold paint and PVA mix was used to create texture and depth, and some small feature items added from the pack.
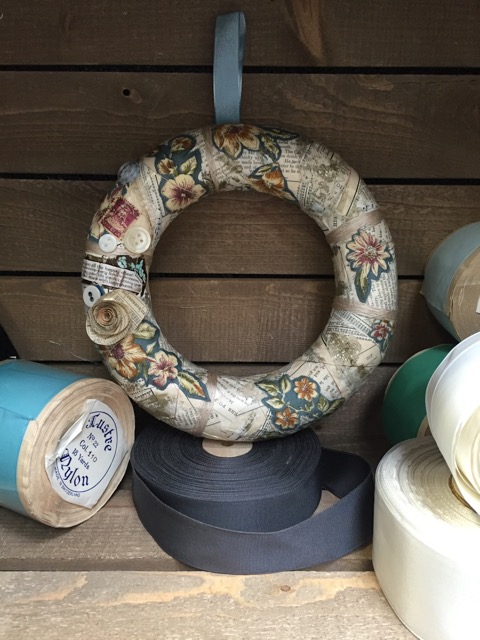

A little paper rose was made using the spiral technique (see previous show) and sealed with a PVA layer.

Finally a large lace flower was stitched (see previous show for technique) and pinned on along with a lace bow and hanging ribbon. 


Don't miss Melissa's amazing Simply Vintage show on Wednesday 17th August at 10am as she shows you just how to get the most from your Craft Inspiration Pack!
You can watch Hochanda live online, Sky channel 663, Freeview 39 (6am - 9pm) or Freesat 817.

Comments

Popular posts from this blog

How to Make a Glittery Star Using the Vivi Gade Paper Star Strips

We're thrilled to welcome Lotte  Littau, the co-founder and co-owner of Creativ Company to Hochanda this week. She's travelled all the way from Denmark to bring you incredible shows across three days, showcasing the Christmas paper range from Creativ Company. Lotte will be bringing you lots of demonstrations throughout her shows on how you can use all of these beautiful papers to create a Scandi Christmas this year. Here's just one of the projects Lotte will be showing this week...  Step 1. Half two 2.5cm wide paper star strips. Now only use three of the four paper star strips. Step 2. Double over each of the three paper star strips and cut all the ends at an angle. Put a star strip around another star strip and fold it tightly three times around this star strip. This is illustrated in the picture. Repeat this process with the other two star strips. Step 3. Assemble the three paper star strips over and under each other, forming three double le

Join us at the Stitching, Sewing & Hobbycrafts show!

Join us at this year's Stitching, Sewing & Hobbycrafts Show!  2nd - 5th November NEC Birmingham. You can grab the hottest ICHF Event tickets right here ! This year's Stitching, Sewing & Hobbycrafts show is going to be even bigger and better than ever, not only will you be able to explore the latest crafting supplies, exclusive product launches and expert demonstrations - a true crafters paradise; there is also free entry to Simply Christmas and Cake International! Taking place at the National Exhibition Centre (NEC) Birmingham from the 2nd - 5th November, discover a whole new world full of creative inspiration all under one roof - and this year there is no compromise! We will be broadcasting live for a full 4 hours a day joined by our very own presenter enthusiasts including Leonie Pujol, Yiannis Morgan, Hayley West, Dave Bradford and Matt MacNamara. Conducting live demonstrations, audience Q&A’s and photo signing opportunities, this is your opportuni

Debbie Shore's Threaders Project 4: Japanese Knot Bag

This stunning bag is actually very simple to make, and can be made as large or as small as you like! Try making it up in different fabrics, denim, faux leather or even silk, which would look lovely when embroidered as an evening bag! Use a 1.4” seam allowance. Materials needed:  • 2 pieces of patterned fabric measuring 19” x 25”  • 2 pieces of lining fabric measuring 19” x 25”  • 2 pieces of fusible fleece measuring the same 1: Cut a curve around the bottom edge of each piece of fabric and fleece. 2. Turn one of the patterned pieces to the wrong side and draw a line each side, from the top, 4” from the side and 12” from the top. Using a 12” circle template, join the lines to make a curve. 3. With the patterned fabrics right sides together, cut around the curved line. You’ll see two handles forming. Measure 8” from the top of one of the handles and cut across. 4. Measure 10” from the bottom of each section on the bag and make a mark on either side.