

Hi Crafters,
I thought I’d share with you one of my
favourite crafts – needle felting! Needle felting is very tactile and has loads
of cross-crafting potential.
Needle felting is created by taking wool
roving (pre-spun wool) and matting that wool together by repeatedly ‘pricking’
the wool fibres with a special type of needle or needles. To help matt the
fibres together the needles have barbs, the barbs look like little thorns that
catch the fibres as the needle is pushed back-and-forth repeatedly through the
fibres. The more you needle the roving – the denser the felt will be. You can
use one needle at a time or for larger areas, or speediness – a multi-needle
tool. As the wool is felted it can be sculpted to make many creative items … figurines,
decorations, embellishments for cards and clothing.
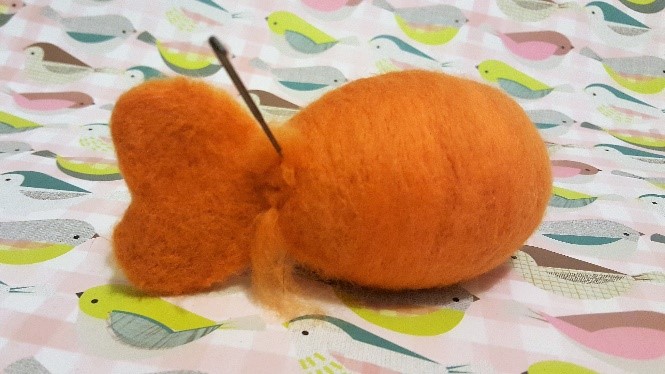
 The goldfish that I made is a simple
introduction to needle felting as it uses a polystyrene egg to form the body of
the fish and cookie/clay cutters as templates.
The goldfish that I made is a simple
introduction to needle felting as it uses a polystyrene egg to form the body of
the fish and cookie/clay cutters as templates.
For this goldfish, I used orange and a
small amount of black and white wool roving, felting needle and felting needle
multi-tool (not essential but helps to speed things up a little on large
areas), polystyrene egg shape, foam block, two different heart shaped
cookie/clay cutters. You may also want a leather thimble, especially if it’s
your first time, as the needle is very sharp and your fingers can get very
close to it. Also, try to find a good quality, dense polystyrene for the body
as the felting needle will be going back and forth pushing the felt into the
polystyrene so you don’t want one that crumbles too easily.
To create the body, I sliced a small piece off the side of the egg so I can lay the egg down flat on its side. I then pulled a small strip of the wool roving and wrapped it around the egg shape. Carefully, push the needle into the polystyrene going through the wool you have laid over it. The needle should go in at a slight angle and be pulled out again at the same angle as you pushed it in as the needles are quite fine and can break. Keep pushing the needle through the wool into the polystyrene until it feels ‘stuck’. Repeat until the egg is covered. If you miss a bit just tear off smaller pieces of the roving and push in to cover the gaps.


You will need to take the wool out of the cutter and off the foam and turn it over regularly as you go because the fibres can become stuck, felted onto the foam. Repeat until the wool is felted into a defined and firm shape.

 Once my hearts had been felted I used
scissors to cut off a small piece at the bottom of the large heart and one of
the small hearts, this just gives a little different shape to the top fin and
tail. Place the tail next to the end of the body holding it with one hand.
Once my hearts had been felted I used
scissors to cut off a small piece at the bottom of the large heart and one of
the small hearts, this just gives a little different shape to the top fin and
tail. Place the tail next to the end of the body holding it with one hand. With the other hand, wrap around the base of the tail a small strip of the wool roving and with the needle push the wrapped around wool into both the base of the tail and the end of the body.
Keep adding strands of roving until the tail is fixed quite firmly, use the same fixing technique to attach the top and side fins.
To create the perfect pout, take a piece
of roving and start by felting it together in a strip on the foam block,
remember to keep turning it over, you only need it felted enough to give it a
solid enough form to start wrapping it around the front of the fish to form a
doughnut-like ring for its pout. Fix it to the body by gently pushing the strip
into the body with your needle. Repeat the process on another piece of roving
and layer it on top of the ring you have made, keep adding layers on top until
you’re happy with the pout. You can make the mouth more defined by tucking in
loose fibres underneath the ring where it connects to the body.


To create the eyes, place a small lump
of white roving onto the foam and gently start felting the roving by pushing
the outer fibres into the middle of the lump, keep rotating the wool as you go
and you should end up with a ball shape. If you need to make it bigger keep
adding roving to the outside and repeat the initial process. Be careful with
your fingers as they are close to the needle on this bit.
Fix the eyes by pushing the fibres of
the eye into the fish’s body. Again, tuck under the eye loose fibres to neaten
and give definition. Finally, add the tiniest amount of black wool roving
directly to the eye with your needle, picking up the looser fibres and folding them
into the centre of where you want the black dot to be.
Finis!
(pun
completely intended)
Lore x

Comments
Post a Comment